
Teach The Game App
Welcome to the Teach The Game App!
The App is designed to help players learn how to play basketball and for coaches to teach the game to their team members.
There are two ways to learn how to use the App:
- Video Presentation
- Step-by-Step Written Instructions.
Both can be found below.
WELCOME TO TEACH THE GAME!
BELOW ARE A VIDEO AND A WRITTEN TUTORIAL FOR THE APP
By Julia Brown
A little bit about Julia:

- Julia played for Coach Robinson and graduated high school in 2014.
- Julia went onto play basketball at Western Carolina University.

Teach The Game App Video Instructions:
Teach The Game App Instructions:
After downloading Teach The Game on your device, click the program andthen go to the HOME screen where you should see the following:
1. “Resources”
2. “Strategies”
3. “Teams and Players”
4. “Settings”
RESOURCES
• When clicking the resources button, you will be linked directly to our website. Information on how to handle
practice, games, on-court and o-court situations are posted on this page.
• There is also a link to the USA Basketball Youth Development Guidebook. This is a great resource to provide
youth basketball players with proper instruction.
• The Resources section of Teach The Game gives users a wealth of information that gives them
a competitive edge.
STRATEGIES
After clicking the Strategies button, you will see four sections:
4. 4. “Sportsmanship”
3. 3. “Advanced Strategies”
2. “Basic Strategies”
1. “Drills”
After clicking the Drills button, you will see three sections:
3. “Play Drill”
2. “Edit Drill”
1. “Create Drill”
• Here you can draw up a basic drill to share with your team members and you can then edit drills to adjust
to unique situations.
After clicking the Basic Strategies button, you will see three sections:
3. “Play Basic Strategy”
2. “Edit Basic Strategy”
1. “Create Basic Strategy”
• Here you can create, edit or play a basic strategy. If you have an offensive play or defensive scheme that
you would like to create and save, you can do so under the “Create Basic Strategy” post
After clicking the Advances Strategies button, you will see three sections:
3. “Play Advanced Strategy”
2. “Edit Advanced Strategy”
1. “Create Advanced Strategy”
• Here you can create an advanced strategy and store it here, so you don’t confuse your team from what the
original basic strategy was. Advanced strategies are meant for plays with counters and more complicated
movements
After clicking “Sportsmanship” you can nd some answers to questions about sportsmanship in relation
to being a good teammate, handling referees, addressing volunteers (score table operators) or event sta
and an unruly parent or fan. Maybe you need an answer on how to handle situations when you’re
winning by a lot or losing by a lot. The “Sportsmanship” tab can help you become a better coach and
begin to teach life lessons through present situations.
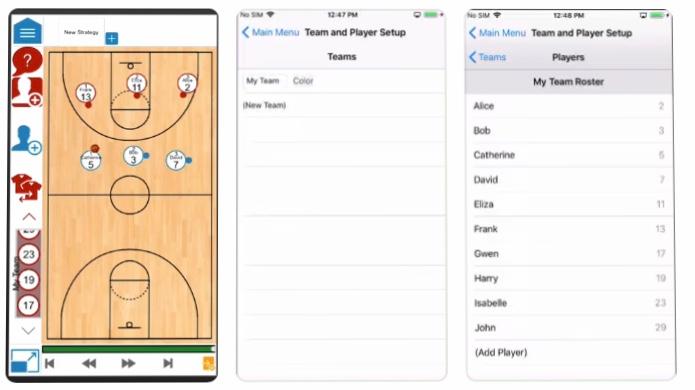
TEAMS AND PLAYERS
• You can enter your team’s name and team roster on this page. If you coach more than one team, you can
add that team to this page as well.
• After adding your team roster, you can, if you have the permission of the parent / guardian of the player,
use your iPad to take a headshot of a player and add that for your roster page. Thus, when you use the
“Strategies” tab, and begin to draw up plays, you will have a “face” instead of a jersey number. This could
be easier for a young player to follow along when drawing up plays in practice or in games. If you store
your plays ahead of time, you can just run the play and each player can see themselves moving from
spot to spot (on offense or defense) on the court.
• If your school, team, program / organization, and / or parents/guardians approve, you can send your
team the plays you want via email on the “Team and Player Setup” page.
*Make sure you have permission from the person in authority at your entity to send emails to your team players*
Click at the bottom of the page. Place your finger on one of the players and drag to the position on the
CREATE A STRATEGY
court where you would like. Note that the first player you use will be listed as a “1” which is typically the point
guard. The player position, 1-5, will be the smaller number at the top of the player’s circle. The larger
number below is the player’s jersey number, unless you are using pictures instead of jerseys.
Using basketball terminology:
1. “1” = Point Guard
2. “2” = Shooting Guard
3. “3” = Small Forward or Wing
4. “4” = Power Forward
5. “5” = Center
Remember, at the top of the page, you can always click on “HELP” if you have any questions.
Choose to playback the strategy that you just created
Movie Playback allows you to watch your play in a continuous motion
Slideshow Playback allows you to watch your play in a frame-by-frame motion
The buttons allow you to rewind or fast forward while playing back your strategy.
To quickly add a new strategy, click the at the top of the screen next to the name of the strategy you are
currently working on.
Straight path lines draw straight lines when you drag a player from one point to another.
Freehand path lines (when clicking the straight path lines option) allows you to move the player as you
wish (as a V-cut, L-cut, curve/curl, etc…)
Add new frame is used to add the next part of your play. When you have your next part of the play ready
to go, click “Add new frame” and then begin designing your next step.
Delete frame is used if you make a mistake and want to redo the design.
“UNDO” and “REDO” buttons allow for you to quickly correct a strategy-loading mistake/error.
Save strategy is used to store your strategy on your device. Most coaches will take time away from
practices and games to store all of their strategies and then when needed, clicking “Load Strategy” will
allow the play to be viewed with a click of that button.
Save strategy as gives you the option to name your strategy.
Create new strategy allows you to build a new play / set when you are ready.
Load strategy will bring up a list of basic strategies that come with this program as well as the strategies
that you have saved.
Load from email allows your players and coaches to load a strategy onto their device that you have sent
to them via email.
Send to team allows you to send plays to your team and coaches for them to view on their devices.
Delete strategy allows you to discard a strategy that you no longer want to use.
Top half allows for you to set up press breaks at the top part of your press break. This is not where you
set up offensive half court plays. .
Full court allows to see the entire court and is good for drawing up presses or press breaks. It is also good
to draw up last second plays.
Bottom half allows you to run offensive plays in the half court. The bottom half of the court is used for
offensive strategies.
Show on whiteboard allows you to view plays on a more traditional fry erase board.
Grid hidden allows you to draw plays on the court without using exact / specific spots. If you click on the
grid, you can position players in an exact positions on the court.
Show player portraits allows you to show the player’s face instead of the jersey. The “show player jerseys”
option will show the player jersey number.
Use “Strategy Notes” to make notes for each player to follow.
Add player to court allows you to add players to the court in drills.
To add a player while creating a strategy, you can choose from the ‘bench’ that has each of your players
numbers.
• Under this tab you can control “Tab Speed”, “Press Length”. “Movie Playback Speed”, “Slideshow Playback
Speed”, “Default Playback Mods” and “Default Jersey View”.
• These tabs help you control how you would like to view the speed of your drills, your offenses and defenses.